Wood-Mode Stonehill Kitchen

Wood-Mode Stonehill Kitchen

Wednesday, May 28, 2014

The Boss's Kitchen: Part 4 (Perimeter-Stove Wall)


This week's "Boss's Kitchen" will be all about the perimeter of the kitchen. Last week we tackled the sink wall so this week we will move onto the stove wall. We left off with the trash pullout so let's start this week's post off with the cabinet to the right of it, the lazy susan.


Lazy susan cabinet with door that tucks away when
cabinet is open and onions/potatoes storage.
This picture shows the susan open and illustrates how the doors rotate within the cabinet so that are tucked away when the susan is opened. This is great as you don't end up with a door hanging around when you try to get in and out of the cabinet. Spinning the susan farther will bring the doors back out of the cabinet and they center themselves correctly in the opening.

The cabinet to the right of the susan is where we store our onions and potatoes. This cabinet comes with three fiberglass bins that are very easy to clean. It is also a great cabinet as it keeps the root vegetables in the dark and handy to the stove and sink for rinsing and chopping.

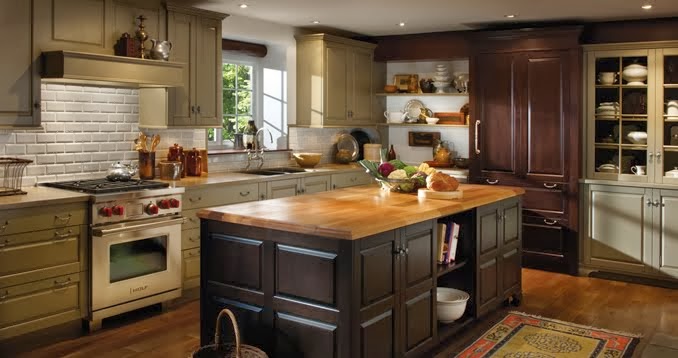
Symmetrical cabinets on either side of hood.

Above the onion and potato cabinet is a nice wide wall cabinet. This cabinet is sized so that it, and the cabinet to the right of the hood, are both the same width. This makes the hood section look symmetrical. 

Custom spice pullout, opened.
To the right of the second wall cabinet, we have a custom spice pullout that we make and design at the store. When I moved our showroom to Waterford, I had an extra wide drawer left over in storage and figured out a way to invert it and turn it into a 24" deep spice pullout. Since then, we now make the pullout with adjustable shelves and have super strong tracks so it will always operate smoothly!

Below this cabinet, we have our pots and pans storage drawers. The drawers are 12" deep so they fits all our cookware very nicely. I installed a wooden divider in the drawer to hold the lids to one side in order to keep the drawer more organized and minimize the "search for the corresponding lid!" game.

Pots and pans storage drawer.
To the right of both the spice pullout and the pots and pans drawers, we have our deep tall pantry cabinet. This cabinet comes with five adjustable roll-outs in the larger lower section that we use for our baking goods. The upper section has an adjustable shelf and makes for nice storage for some of our pyrex dishes.

Tall pantry cabinet
This concludes the stove wall of our kitchen. If you have any questions, please ask us on our Facebook page or send us an email. Stay tuned for next week's post on the refrigerator wall of my kitchen.


All the best,Bill Hecht

President & CEO
David Hecht Custom Kitchens


Tuesday, May 20, 2014

The Boss's Kitchen: Part 3 (Perimeter-Sink Wall)

This week's "Boss's Kitchen" will be all about the perimeter of the kitchen. This is going to be the largest post, as there is A LOT to talk about (in both placement of items and special features of the cabinets) so I think I'll break it into two posts (this one for the sink wall and the next post for the range wall). Let's get started!


Sink wall of kitchen

Let's start with the wall that our sink is on.


9" wide cabinet with adjustable shelf
We start off with a 9" wide cabinet that has an adjustable shelf. This type of cabinet is perfect for storing cutting boards, baking trays, cooling racks, etc. (basically anything that is flat and long). Since the shelf is adjustable, it allows us to raise or lower it depending on what size item we want to store. To the right of this cabinet is our dishwasher. We purchased a Bosch 500 series (more on that in a later post). Above both of these cabinets is a nice wide wall cabinet. All of our wall cabinets are 36" high which gives us three adjustable shelves. This particular cabinet is perfect for storing our dishes as it is right above the dishwasher and in close proximity to our table.


Sink and double trash pullout
Next to our dishwasher, we have our sink. We selected a nice deep 23" wide single bowl sink. Having a nice big single bowl sink allows us to let large pots, pans and trays soak inside it. This keeps them off the counter and helps minimize scrubbing (the bane of everyone's existence!). Under the sink cabinet, we store all of our cleaning products and have a rubber mat that can hold up to three gallons of water (pretty nice so we don't have to worry about the cabinets being damaged if there is a slow leak we don't catch right away - though hopefully we never have to deal with that problem!).

To the right of our sink is our double trash pullout. We use one bin for trash and one for recyclables. The cabinet manufacturer, Wood-Mode, uses a solid board under the drawer above the trash bins to keep anything that could fall out of the drawer from landing in a bin. 

This concludes the sink wall of our kitchen. If you have any questions, please ask us on our Facebook page or send us an email. Stay tuned for next week's post on the second half of our kitchen perimeter.

All the best,
Bill Hecht
President & CEO
David Hecht Custom Kitchens

Tuesday, May 13, 2014

The Boss's Kitchen: Part 2 (Island!)

This week's "Boss's Kitchen" post will be all about my island. I want to discuss my decision on the shape of the island, as well as some special features my wife and I included. 

Let's start with the shape.  We picked this "T" shape mainly because our room (as many of our clients' rooms) is not quite wide enough for a typical island width (usually between 24" and 48" wide). To allow for good walkways (42" wide) we had to size the island appropriately to fit between our counter depth refrigerator (more on that in a later post) and our counter with the sink. This only left space for 21" deep cabinets facing the counter with the sink.  

We knew that we wanted an open bookcase cabinet on the end of our island and, frankly, we didn't love the look of a 21" wide bookcase. So, we decided to use a 27" wide bookcase to give the island a larger look even though the rest of it was 6" shallower. Here is a picture of how it looks with the "T" shape and larger bookcase:


Moving along now to some of the special features.... We wanted a nice place to store a few bottles of wine. To do this, I created a 6" wide void between the island cabinets and made wine cubes out of cabinet material. Here is the finished product:


On the reverse side, we also had this same 6" void. By code, every island needs electrical outlets so this void gave us the perfect place to put our outlet (plus it's now super easy to use a mixer or other electrical products on the island!). Underneath this outlet, I installed a small hook for a hand towel (and this is a perfect location for it, since it's right across from the sink).  


On either side of the hand towel cubby, we elected to use drawer base cabinets. The one on the left is used to store our mixing bowls and Tupperware containers. This is a great place for both, as the majority of our prep-work and cleanup happen on the island. In the cabinet on the right, we store aluminum foil, plastic wrap, Ziploc bags, etc. 

So, that's the overview of the island we designed for our kitchen. If you have any questions, please ask us on our Facebook page or send us an email.  Stay tuned for next week's post on the perimeter features of our kitchen.

All the best,
Bill Hecht
President & CEO
David Hecht Custom Kitchens

Tuesday, May 6, 2014

The Boss's Kitchen: Part 1 (Welcome!)


As President of David Hecht Custom Kitchens, I often get asked, “well, what does your kitchen look like?”.  So, I’ve decided to start this new series of blog posts that will answer that very question.  To begin, I’ll provide a brief overview of my kitchen.  In future posts, which will be posted each week on Tuesday, we’ll go into more specific details on the features and functionality of my kitchen.   

To begin, my wife and I selected Brookhaven cabinets, made by Wood-Mode, in a stained maple.  The stain is called nutmeg and gives maple a nice warm feel (maple tends to stain either more blonde or brown, so this particular stain is a little bit different than what you'd normally see).  

We decided on cabinets that bring the crown moulding right up to our 8' ceiling.  This eliminates the dust collector on top of the cabinets and provides an additional shelf for storage within the cabinet.

To complement the crown moulding, we have a light valence attached to the bottom of the wall cabinets.  What's a light valence?  It's simply a piece of moulding that is used to hide under-cabinet lighting (in our case, LED light bars).  This valence also helps finish off the aesthetics of the kitchen.

Here are two photos of the kitchen so you can see what I'm talking about.  We'll have more detailed photos and discussion in next week's post on the features in the island of the kitchen.  If you have any questions in the meantime, please ask us on our Facebook page or send us an email.

All the best, 
Bill Hecht
President & CEO
David Hecht Custom Kitchens