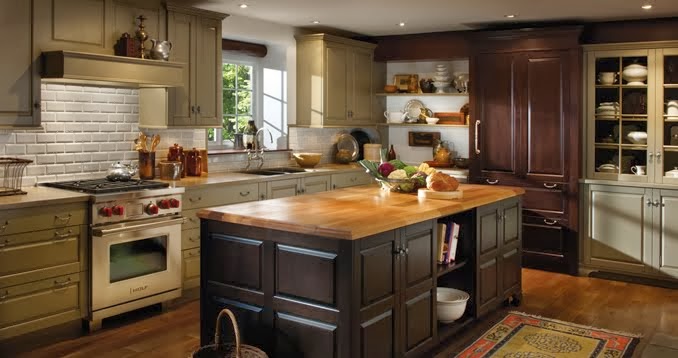
Wood-Mode Stonehill Kitchen

Wood-Mode Stonehill Kitchen

Wednesday, July 2, 2014

It's Recipe Time Again! Arugula and Quinoa Salad with Egg

Since we've written a lot about kitchens recently through our series on The Boss's Kitchen (if you haven't read the posts, check them out now!), we thought we'd mix it up and share a new recipe.

This recipe came from our good friends at Good Bug Gardens, a CSA farm located in nearby Sterling, CT.  Every week, we get a bag of delicious, fresh, local vegetables, along with some neat ideas for turning these veggies into tasty dishes!  The recipe we'll share below is great for an easy-to-make, light, healthy, downright delicious summer dinner dish.  Read on and be sure to let us know if you try it out!

Ingredients you'll need include arugula (or other greens), quinoa, a lemon, eggs, red onion, apple, and eggs.


Ingredients:

  • Bag of arugula (or other green - we used a bunch of kale and about half a bag of spinach - ignore the cilantro in the image above, although that might be tasty as well!)
  • 8 oz quinoa (or orzo pasta), uncooked
  • 1/2 lemon
  • 1 red onion
  • 1 granny smith apple (we used a red delicious and that worked just fine!)
  • 1/2 cup pine nuts (we unfortunately didn't have any pine nuts on hand, so we skipped this ingredient, but the dish still came out DELICIOUS!)
  • 3 eggs

Start by chopping up that onion and getting it on the skillet with a bit of oil. 

Chopped onions.
You want it over low heat, stirred often, until soft and translucent if not caramelized. While you whistle along with that, bring 16 oz of water to a boil, add the quinoa, and when the water returns to a boil, reduce heat to low.   

While that's cooking away, chop the apple into thin chunks. 


Thinly sliced apples.

When there isn't any more water in the quinoa, it's done. Pour it in a big bowl, add the arugula, expertly cooked onions, apple chunks and pine nuts, then squeeze that lemon all over it. 


Greens and red onions mixed together.

Squeeze the lemon over the mixed greens, onion, quinoa, and apple chunks.

Finally, use that onion skillet to fry up the eggs (however you like them!) and serve them on top of the quinoa and grain salad.  

Enjoy!  And feel free to share any recipe modification ideas you may have if you try this out - we're always curious to try new things.  :)

Yum!  This is definitely a repeat-worthy recipe!
Recipe courtesy of Good Bug Gardens.  Learn more about Good Bug Gardens here:  http://goodbuggardens.com/.  


Wednesday, June 25, 2014

The Boss's Kitchen: Part 8 (Appliances, Sink and Faucet)

This week will be the final post in "The Boss's Kitchen" series. We are down to the final parts! Let's take a look at the appliances we selected as well as our sink and faucet.

Counter Depth Fridge
We'll start with our refrigerator.  We knew we wanted a french door style fridge (double doors on the top and a drawer on the bottom for the freezer). I love how even with a 36" wide refrigerator the doors only take up 18" of the walkway since there are two of them. Our room is not very deep (hence the shallower island) so we needed to get a shallow, counter depth fridge. The one that caught our eye was this Electrolux counter depth. It is a nice size for a fridge and fits the room well.

Bosch 500 Series Dishwasher
The dishwasher was an easy selection for us. I have always been drawn to Bosch dishwashers because of how quiet they are. We selected the 500 Series Bosch because I loved the extra sound deadening in the bottom panel. It is stainless on the inside as well which eliminates staining and helps keep any odors to a minimum.

30" Wolf Dual Fuel Range
For a range, we went with a 30" wide Wolf dual fuel. It has gas burners and an electric oven. The beauty of this setup is that you get the control of gas for cooking on the stove-top and the precision of the electric oven (the oven has presets for cooking different dishes and knows when your food is cooked!). The amount of control on the stove-top is amazing. Chocolate can be melted easily, and with no need for a water bath, as the burners go low enough to melt but not burn. The burners also provide plenty of heat when you want to stir-fry or boil so you get the best of both worlds.

36" Best Exhaust Hood
To exhaust all the heat the burners produce, we selected a 36" wide Best chimney style hood. The 36" width is 6" wider than our range which gives the wall cabinets on either side 3" before they are even with the burners. The hood comes with a 600CFM blower which works great with our range. Best is known for having fantastic blowers and this one is no exception. It has plenty of suction and never needs to be turned on high.

23" Wide Dawn Single Bowl Sink with Blanco Hydra Faucet
Now onto our sink and faucet. For the sink, we went with a 23" wide Dawn single bowl sink. This sink is 2" wider than a standard single bowl which provides a little extra room inside for soaking bigger items (I'm looking at you, fry pans and baking sheets...). It is 10" deep so even large stock pots fit nicely inside of it without creating an issue with the faucet.

The faucet is a Blanco Hydra. All the faucets we supply come with ceramic disks (as opposed to plastic washers) where you control "hot and cold", and a brass interior so they hold up to the test of time. This particular faucet has a pull-out spray head which eliminates the need for a side spray. This is very convenient and practical is it keeps both items in one unit and gets rid of another piece to clean around on the counter.

This concludes "The Boss's Kitchen" series. Thanks a lot for reading. Stay tuned for more "Before and Afters", recipes and general kitchen posts in the future! As always, feel free to hit us up on our facebook page or shoot us an email if you have any questions.

All the best,
Bill Hecht
President & CEO
David Hecht Custom Kitchens


Tuesday, June 17, 2014

The Boss's Kitchen: Part 7 (Lighting)

This week's "Boss's Kitchen" will focus on what kind of lighting we use in our kitchen.
Recessed cans around our kitchen perimeter

Here is an overview of the lighting we used and why we used it. The goal, when deciding on how to light a kitchen, is to create the best task lighting you can without creating shadows. When I go into a lot of my customers' kitchens, most people have a central dome light in the center of their kitchen. While this type of fixture throws a lot of light, it always creates shadows as the person working in the kitchen is always in front of it.

To remedy this problem in our kitchen, we used "layered lighting". We start off the layers by strategically placing 5" recessed can lights around the perimeter of the kitchen. The lights are installed so that they shine down on the front edge of the counter. This keeps them in front of the person cooking so they won't create shadows. 

LED under-cabinet light bar
The next layer is task lighting for the counter under the wall cabinets. For these lights, we opted for some LED under-cabinet light bars. These throw a ton of light and use almost no electricity.


Pendants and directional lights hanging from monorail


The final light layer for our kitchen was the lighting above the island. This is a great place to use different kinds of light. We have a couple pendant lights that hang from a "monorail" light track. When using pendants, it is an excellent opportunity to bring in some different colors to help tie the room together. The monorail provides a great source for electricity for our pendants as well as directional lighting. The directional lights we use shine on our hood (was a darkish area due to no recessed can) and fridge. 

Next week will be our final post of this series and will focus on the appliances we selected for our kitchen as well as the sink and faucet. Thanks a lot for reading and as always hit us up on our facebook page or shoot us an email if you have any questions!

All the best,
Bill Hecht
President & CEO
David Hecht Custom Kitchens

Tuesday, June 10, 2014

The Boss's Kitchen: Part 6 (Counter Tops and Backsplash)

This week's "Boss's Kitchen" will focus on our counter tops and backsplash. 

To start off this post, let's tackle our counter selections.

On the perimeter of our kitchen we chose to use light colored Cambria Quartz counters. Quartz is a manufactured, non-porous product that consists of natural quartz, that is quarried from the ground, and a resin. The resin holds the quartz particles together and is what makes the product non-porous. Between its non-porous property and how hard it is, this counter can take a ton of abuse and not show it. The color pattern we chose is called Waverton.


For our island surface we selected soapstone. I just love the way soapstone looks and feels. It is very soft so it can chip and scratch if carelessly used but it has a wonderful feel because of its softness. We chose a black soapstone but it can come in various colors such as grey and green.


The last topic of this post will be the backsplash. We wanted something earthy looking to complement our soapstone island and our pendent lights (more on that in next week's post), so we chose multi-colored slate tiles with a tan grout. The slate has a slightly coarse feel to it and goes great with our brown maple cabinets. We elected to coat our tiles with a sealer and enhancer to both protect them from staining and to really bring out the various colors.


This concludes our post on counter tops and backsplash. If you have any questions, please ask us on our Facebook page or send us an email. Stay tuned for next week's post on our lighting!

All the best,

Bill Hecht
President & CEO
David Hecht Custom Kitchens


Tuesday, June 3, 2014

The Boss's Kitchen: Part 5 (Refrigerator Wall)

This week's "Boss's Kitchen" will focus on the refrigerator wall of the kitchen.

Here is the overall look of the fridge section. It is comprised of three parts: a shallow tall cabinet to the left of the fridge, the fridge and its enclosure, and the microwave section.

The shallow tall cabinet is simply a cabinet with adjustable shelving. I designed it to be 24" wide so that it would line up perfect with the front of our shallow refrigerator. We also kept it to 13" deep which is plenty deep to store most items but not deep enough where items will get lost in the back of the shelves. We store our nicer dishes and table linens in here as well as pitchers and vases.


Next we have the enclosure for the refrigerator. It is comprised of two long wooden panels down both sides, a 24" deep wall cabinet above, and a small wooden panel in-between the wall cabinet and fridge. All of this is used to fully enclose the sides of the refrigerator, so only the doors of the refrigerator are exposed, providing a custom, built-in look.   

Fridge and microwave section

Finally, we have the microwave section.  This section includes a wall cabinet that houses our microwave and a base cabinet with one drawer and two adjustable roll-outs.  The microwave cabinet has an opening that we sized perfectly for our microwave so we could get it off the counter top to free up space.  This counter is used for our coffee maker and the drawer in the base cabinet holds all of our various teas.  The cabinet with roll-outs is good storage for odds and ends that don't quite in a drawer (glass platters, placemats, etc.).  
This concludes the refrigerator wall of our kitchen. If you have any questions, please ask us on our Facebook page or send us an email. Stay tuned for next week's post on our counter tops and backsplash!


All the best,Bill Hecht

President & CEO
David Hecht Custom Kitchens


Wednesday, May 28, 2014

The Boss's Kitchen: Part 4 (Perimeter-Stove Wall)


This week's "Boss's Kitchen" will be all about the perimeter of the kitchen. Last week we tackled the sink wall so this week we will move onto the stove wall. We left off with the trash pullout so let's start this week's post off with the cabinet to the right of it, the lazy susan.


Lazy susan cabinet with door that tucks away when
cabinet is open and onions/potatoes storage.
This picture shows the susan open and illustrates how the doors rotate within the cabinet so that are tucked away when the susan is opened. This is great as you don't end up with a door hanging around when you try to get in and out of the cabinet. Spinning the susan farther will bring the doors back out of the cabinet and they center themselves correctly in the opening.

The cabinet to the right of the susan is where we store our onions and potatoes. This cabinet comes with three fiberglass bins that are very easy to clean. It is also a great cabinet as it keeps the root vegetables in the dark and handy to the stove and sink for rinsing and chopping.

Symmetrical cabinets on either side of hood.

Above the onion and potato cabinet is a nice wide wall cabinet. This cabinet is sized so that it, and the cabinet to the right of the hood, are both the same width. This makes the hood section look symmetrical. 

Custom spice pullout, opened.
To the right of the second wall cabinet, we have a custom spice pullout that we make and design at the store. When I moved our showroom to Waterford, I had an extra wide drawer left over in storage and figured out a way to invert it and turn it into a 24" deep spice pullout. Since then, we now make the pullout with adjustable shelves and have super strong tracks so it will always operate smoothly!

Below this cabinet, we have our pots and pans storage drawers. The drawers are 12" deep so they fits all our cookware very nicely. I installed a wooden divider in the drawer to hold the lids to one side in order to keep the drawer more organized and minimize the "search for the corresponding lid!" game.

Pots and pans storage drawer.
To the right of both the spice pullout and the pots and pans drawers, we have our deep tall pantry cabinet. This cabinet comes with five adjustable roll-outs in the larger lower section that we use for our baking goods. The upper section has an adjustable shelf and makes for nice storage for some of our pyrex dishes.

Tall pantry cabinet
This concludes the stove wall of our kitchen. If you have any questions, please ask us on our Facebook page or send us an email. Stay tuned for next week's post on the refrigerator wall of my kitchen.


All the best,Bill Hecht

President & CEO
David Hecht Custom Kitchens


Tuesday, May 20, 2014

The Boss's Kitchen: Part 3 (Perimeter-Sink Wall)

This week's "Boss's Kitchen" will be all about the perimeter of the kitchen. This is going to be the largest post, as there is A LOT to talk about (in both placement of items and special features of the cabinets) so I think I'll break it into two posts (this one for the sink wall and the next post for the range wall). Let's get started!


Sink wall of kitchen

Let's start with the wall that our sink is on.


9" wide cabinet with adjustable shelf
We start off with a 9" wide cabinet that has an adjustable shelf. This type of cabinet is perfect for storing cutting boards, baking trays, cooling racks, etc. (basically anything that is flat and long). Since the shelf is adjustable, it allows us to raise or lower it depending on what size item we want to store. To the right of this cabinet is our dishwasher. We purchased a Bosch 500 series (more on that in a later post). Above both of these cabinets is a nice wide wall cabinet. All of our wall cabinets are 36" high which gives us three adjustable shelves. This particular cabinet is perfect for storing our dishes as it is right above the dishwasher and in close proximity to our table.


Sink and double trash pullout
Next to our dishwasher, we have our sink. We selected a nice deep 23" wide single bowl sink. Having a nice big single bowl sink allows us to let large pots, pans and trays soak inside it. This keeps them off the counter and helps minimize scrubbing (the bane of everyone's existence!). Under the sink cabinet, we store all of our cleaning products and have a rubber mat that can hold up to three gallons of water (pretty nice so we don't have to worry about the cabinets being damaged if there is a slow leak we don't catch right away - though hopefully we never have to deal with that problem!).

To the right of our sink is our double trash pullout. We use one bin for trash and one for recyclables. The cabinet manufacturer, Wood-Mode, uses a solid board under the drawer above the trash bins to keep anything that could fall out of the drawer from landing in a bin. 

This concludes the sink wall of our kitchen. If you have any questions, please ask us on our Facebook page or send us an email. Stay tuned for next week's post on the second half of our kitchen perimeter.

All the best,
Bill Hecht
President & CEO
David Hecht Custom Kitchens

Tuesday, May 13, 2014

The Boss's Kitchen: Part 2 (Island!)

This week's "Boss's Kitchen" post will be all about my island. I want to discuss my decision on the shape of the island, as well as some special features my wife and I included. 

Let's start with the shape.  We picked this "T" shape mainly because our room (as many of our clients' rooms) is not quite wide enough for a typical island width (usually between 24" and 48" wide). To allow for good walkways (42" wide) we had to size the island appropriately to fit between our counter depth refrigerator (more on that in a later post) and our counter with the sink. This only left space for 21" deep cabinets facing the counter with the sink.  

We knew that we wanted an open bookcase cabinet on the end of our island and, frankly, we didn't love the look of a 21" wide bookcase. So, we decided to use a 27" wide bookcase to give the island a larger look even though the rest of it was 6" shallower. Here is a picture of how it looks with the "T" shape and larger bookcase:


Moving along now to some of the special features.... We wanted a nice place to store a few bottles of wine. To do this, I created a 6" wide void between the island cabinets and made wine cubes out of cabinet material. Here is the finished product:


On the reverse side, we also had this same 6" void. By code, every island needs electrical outlets so this void gave us the perfect place to put our outlet (plus it's now super easy to use a mixer or other electrical products on the island!). Underneath this outlet, I installed a small hook for a hand towel (and this is a perfect location for it, since it's right across from the sink).  


On either side of the hand towel cubby, we elected to use drawer base cabinets. The one on the left is used to store our mixing bowls and Tupperware containers. This is a great place for both, as the majority of our prep-work and cleanup happen on the island. In the cabinet on the right, we store aluminum foil, plastic wrap, Ziploc bags, etc. 

So, that's the overview of the island we designed for our kitchen. If you have any questions, please ask us on our Facebook page or send us an email.  Stay tuned for next week's post on the perimeter features of our kitchen.

All the best,
Bill Hecht
President & CEO
David Hecht Custom Kitchens

Tuesday, May 6, 2014

The Boss's Kitchen: Part 1 (Welcome!)


As President of David Hecht Custom Kitchens, I often get asked, “well, what does your kitchen look like?”.  So, I’ve decided to start this new series of blog posts that will answer that very question.  To begin, I’ll provide a brief overview of my kitchen.  In future posts, which will be posted each week on Tuesday, we’ll go into more specific details on the features and functionality of my kitchen.   

To begin, my wife and I selected Brookhaven cabinets, made by Wood-Mode, in a stained maple.  The stain is called nutmeg and gives maple a nice warm feel (maple tends to stain either more blonde or brown, so this particular stain is a little bit different than what you'd normally see).  

We decided on cabinets that bring the crown moulding right up to our 8' ceiling.  This eliminates the dust collector on top of the cabinets and provides an additional shelf for storage within the cabinet.

To complement the crown moulding, we have a light valence attached to the bottom of the wall cabinets.  What's a light valence?  It's simply a piece of moulding that is used to hide under-cabinet lighting (in our case, LED light bars).  This valence also helps finish off the aesthetics of the kitchen.

Here are two photos of the kitchen so you can see what I'm talking about.  We'll have more detailed photos and discussion in next week's post on the features in the island of the kitchen.  If you have any questions in the meantime, please ask us on our Facebook page or send us an email.

All the best, 
Bill Hecht
President & CEO
David Hecht Custom Kitchens  


Wednesday, April 23, 2014

Happy Belated Earth Day!

Since Earth Day was yesterday we thought we should share a bit about what we have been doing to help the environment. 

This past year, we decided to invest in new energy efficient lighting in our showroom. Previously, we had been using halogen bulbs to light our displays as they provided a bright warm light. They also unfortunately generated a lot of heat and used exorbitant amounts of power to run. We switched everything over to new LED bulbs throughout our showroom. The new bulbs offer a similar warmth to our halogens but at a fraction of the energy and they generate almost no heat (this was instantly apparent during the hot summer months as our air conditioner was not turning on nearly as much). It was a simple change that really affected our energy consumption in a positive way. The other great thing about the new bulbs is that they are supposed to last for around 20 years! We were easily replacing halogens at least twice a year which definitely added to the amount of trash we generated.

Happy Earth Day from David Hecht Custom Kitchens!

Monday, April 7, 2014

Infographic: Redoing your kitchen? What to know.

Hi everyone!  We often get asked about what to consider when beginning to plan a kitchen makeover.  So, we put together the below infographic to help organize the different elements.  If you have any questions, let us know!