Wood-Mode Stonehill Kitchen

Wood-Mode Stonehill Kitchen

Wednesday, April 23, 2014

Happy Belated Earth Day!

Since Earth Day was yesterday we thought we should share a bit about what we have been doing to help the environment. 

This past year, we decided to invest in new energy efficient lighting in our showroom. Previously, we had been using halogen bulbs to light our displays as they provided a bright warm light. They also unfortunately generated a lot of heat and used exorbitant amounts of power to run. We switched everything over to new LED bulbs throughout our showroom. The new bulbs offer a similar warmth to our halogens but at a fraction of the energy and they generate almost no heat (this was instantly apparent during the hot summer months as our air conditioner was not turning on nearly as much). It was a simple change that really affected our energy consumption in a positive way. The other great thing about the new bulbs is that they are supposed to last for around 20 years! We were easily replacing halogens at least twice a year which definitely added to the amount of trash we generated.

Happy Earth Day from David Hecht Custom Kitchens!

Monday, April 7, 2014

Infographic: Redoing your kitchen? What to know.

Hi everyone!  We often get asked about what to consider when beginning to plan a kitchen makeover.  So, we put together the below infographic to help organize the different elements.  If you have any questions, let us know!


Wednesday, March 26, 2014

Before and After: Can we keep our seating?

We often hear from our customers that it’s hard to envision what a redesigned kitchen will look like in their space. To help, we offer the following before and after story based on one of our real-life customer installations.

Gary and Jodi first came to our showroom because their current kitchen wasn't working for them anymore.  They wanted a better workflow but didn't want to lose the seating for four on their island.  However, the island was too big for the space, causing tight walkways on all sides.


In order to maintain seating for four, we decided to turn the island into a peninsula so we could pull it away from the rest of the kitchen and up against a wall.  

Gary and Jodi decided to go with a natural cherry cabinet which gives the room a rich feel.  Their choice of wall color, backsplash, and granite countertop complement the warm tones of the wood.

Here are some before and after shots to take a look at:


Before:  Island in center of kitchen.
After:  We replaced the island with a peninsula to maintain seating for four, but allowing more walk area around.

Before:  The range was pressed right up against the end wall and there was very limited space between the sink and the range.
After:  We moved the range off this wall to provide more counter space around the sink.  We also recessed the wall cabinet above the sink to allow more head room.

Before:  Wall with fridge.
After:  We moved the range from the sink wall and turned it into a wall oven and induction cooktop.  
After:  Here's a close-up of the induction cooktop and tumbled marble backsplash.

Before:  Seating at the island, looking into the kitchen.
After:  Seating at the peninsula that we anchored to the newly constructed knee wall.
After:  We also added a cabinet for a future computer and included a grommet in the granite countertop for routing cables.

After:  The new Armstrong laminate flooring.

Before:  The existing cabinet sat on top of the basement stairs and had been cut to fit alongside the other cabinets on that wall, making the bottom of the cabinet unusable.  Here is what the cut in the cabinets looked like and how the space was unusable. The brown is the back of the stairway.
After:  We cut the oven cabinet to allow for the stairway, as the original cabinet had done. However, we applied a real cherry veneer to the inside of the cabinet and attached the drawer head with special hinges, allowing the area to be accessed.

Tuesday, March 18, 2014

What's left in the fridge??: TACOS!

Due to the fact that our local taqueria has been shut down (we'll miss you Lazy Burrito!)... we needed another way to get our taco fix! So, we present you with (drum roll please)... 

What's left in the fridge??: TACOS! 

All the fixings!
Ingredients: 
  • Whole wheat tortillas
  • 2 yellow onions, sliced
  • 1/2 lbs. beef (strips, ground - whatever you've got!) 
  • 1 cup lettuce, shredded
  • 1 tomato, chopped
  • 1 cup shredded cheese (your choice of type) 
  • 1 can black olives (sliced) 
  • Salsa, to taste (your choice of brand and spiciness) 
  • Sour cream
  • Olive oil (about 1 tablespoon)
  • Salt and pepper, to taste
  • Whatever else you'd like to add to your tacos!
Guacamole: 
  • 2 ripe avocados, quartered and mashed in a bowl 
  • 2 cloves fresh garlic, minced 
  • 1 tomato, chopped
  • Splash of lemon juice
First, heat oil in a large skillet.  Once hot, add the onions, season with salt and pepper, and cook until translucent (about 5 minutes).  Set aside.

Translucent onions.

In the same skillet, add more oil, if needed.  Slice beef into thin strips and add to hot pan, season with salt and pepper.  Cook until no longer red (time will vary based on meat).

Almost fully cooked beef!

Meanwhile, prepare the guacamole by quartering both avocados and scooping into a bowl.  Mince the garlic cloves, chop tomatoes and add both to bowl.  Add a splash of lemon juice and mash/mix together.

Whole wheat tortillas, fresh tomatoes, ripe avocados.

There's nothing better than fresh avocado!

 Prepare remaining ingredients (plus whatever else you'd like to include!) and get ready to dig in!
  
Scoop ingredients of choice into tortilla and attempt to roll up - we give you bonus points if you're successful!

Stuffed taco, topped with BBQ sauce.

P.S.  Like we said, feel free to add any of your "own" ingredients based on tastes, preferences, or what's available in your fridge.  We even added BBQ sauce to our dish this evening!

P.P.S.  For the best dining experience, pair your What's left in the fridge??: TACOS! dinner with a fresh margarita, or two.

Monday, February 17, 2014

Plywood vs Particleboard Construction

There are many variables to consider when shopping for kitchen cabinets.  One of the things you will come across is what cabinet box material to select.  A common misconception we hear all the time from customers is that a plywood cabinet box makes a better cabinet and ultimately superior product. What they are talking about is which material the cabinet box (top, bottom, sides and shelves) is constructed of. Most commonly cabinets will either be constructed from plywood or particleboard. Both materials have their strengths and weaknesses.

Plywood Constructed Cabinet Box


The biggest pro to plywood would be its overall holding power; a screw going into plywood has a more dense material to bite into and thus can hold more weight.

The biggest con to plywood would be its ability to cup and twist. A piece of plywood can cup (the board is not straight with opposite edges of the board pulling towards each other) and twist (opposite corners of the board going in opposite directions). Both of these problems result in a board that is not perfectly straight. This can become a problem when using frameless cabinets (we'll get into this in another post) as there is no margin for error between the cabinets.

Particleboard Constructed Cabinet Box


The biggest pro to particleboard would be that the board is always perfectly straight. This is great for veneering exposed sides and, as mentioned above, makes frameless installation a breeze. Another pro would be that particleboard usually costs less than plywood.  This allows manufacturers that offer both materials to lower the price of particleboard, potentially saving you thousands!

The biggest con to particleboard would be the overall strength of the material.  This encompasses both the holding power (as listed above if not properly compensated for), and stability, as some may experience sagging shelves if a lower grade particleboard is used.

Customers will usually ask us about how exposure to water will affect the cabinetry with both plywood and particleboard. While it is true that particleboard is more affected by water than plywood, in our experience neither material holds up well if water were to flood into the kitchen.

So now that we have the basics of two cabinet box materials, which one to choose? This is personal preference but at our company we usually recommend particleboard construction for our kitchens. The cost savings and ease of installation, for us, offsets any negatives between the two materials and besides, can you tell which is which?

The Veneered Sides of Both Particleboard and Plywood Cabinet Boxes

The Veneered Front Edges of Both Particleboard and Plywood Cabinet Boxes


Monday, February 10, 2014

Gimme Some Greek!

Some Greek Quinoa Salad, that is. 

This is another one of our favorite recipes that we especially love for weeknights because it's so easy to make.  It's also a great source of protein (quinoa has been called the "queen of grains" as it provides about 9 grams of protein per cooked cup and is a "complete protein").  Plus, if you make a big batch (like we do), you'll have plenty of leftovers for lunch the rest of the week!

Gimme Some Greek!  Greek Quinoa Salad
Served on a bed of greens.

Ingredients:
  • 2.25 cups (dry) quinoa (plain)
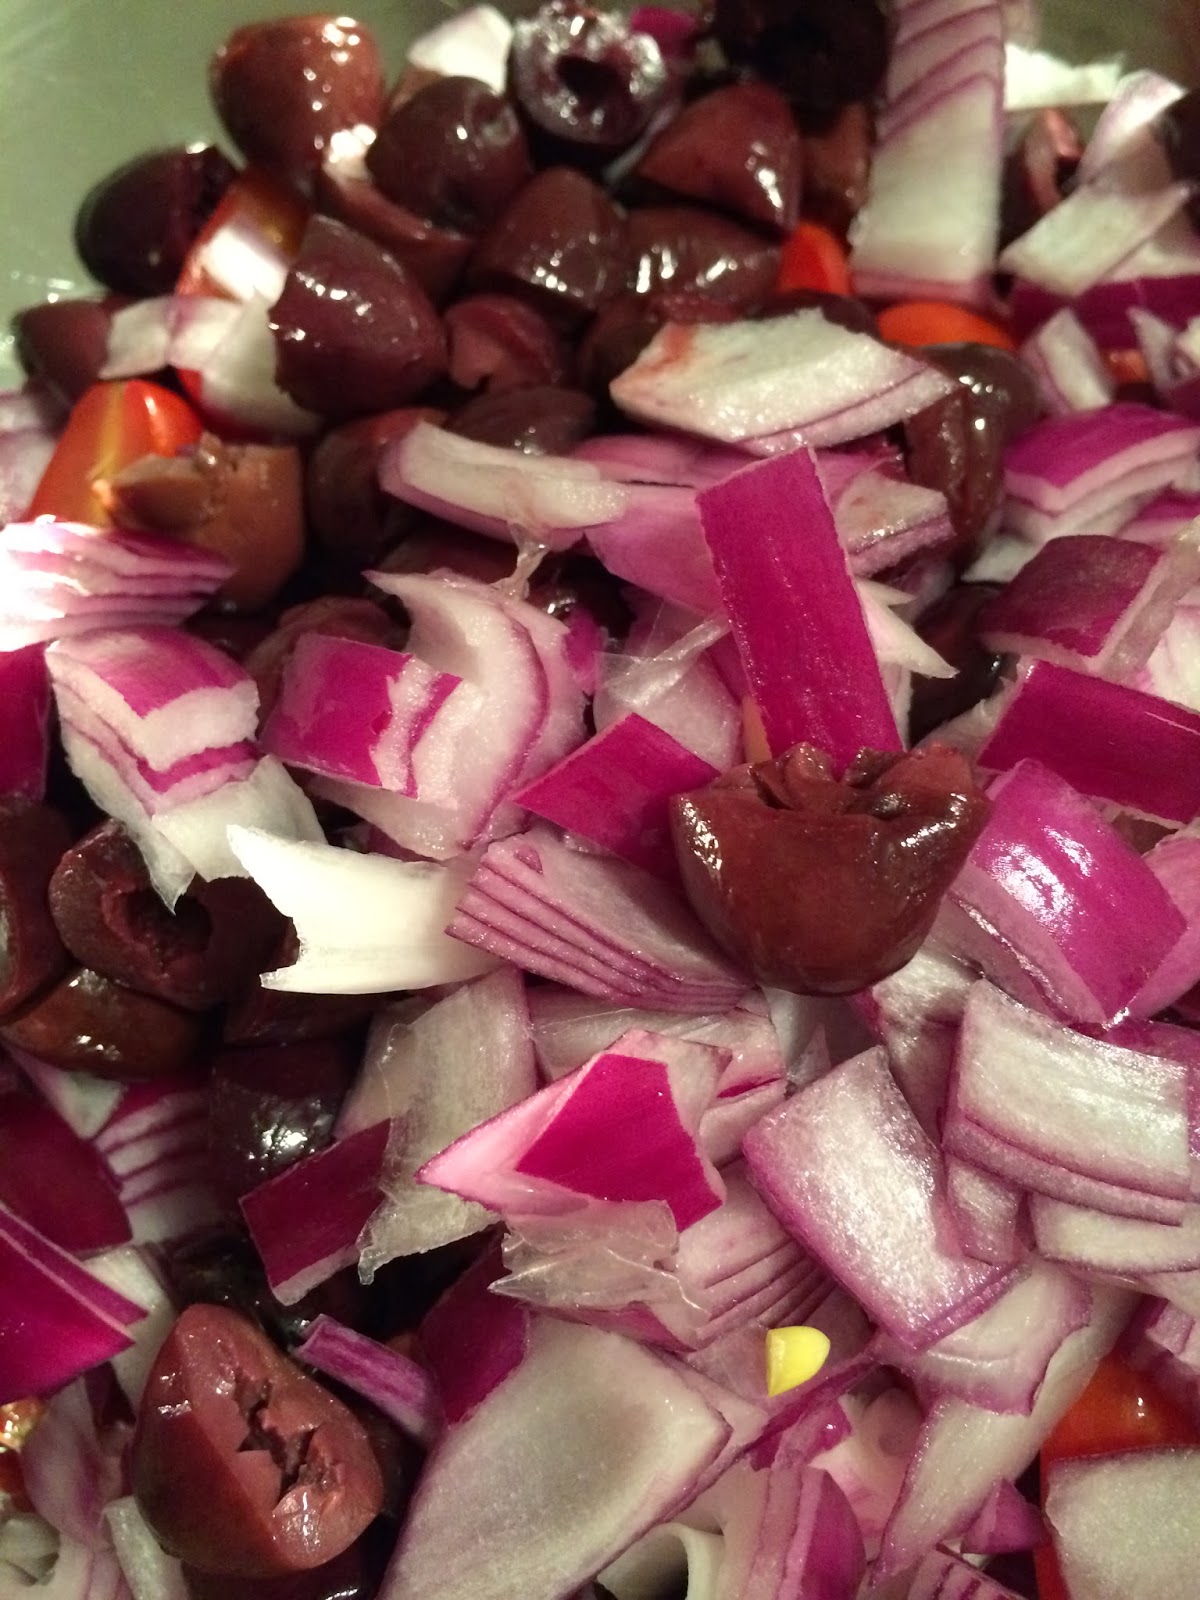
  • 1 cup pitted kalamata olives, sliced
  • 2 pints cherry tomatoes, halved
  • 1 red onion, diced
  • 2 jars marinated artichoke hearts (note: definitely spring for the marinated version as you can pour the entire jar into the recipe so they oil/vinegar/spices marinade becomes the dressing for the salad!)
  • A few handfuls of spinach
  • 1 pint feta cheese
  • Delicious additional ingredients that you can add if you'd like:  chopped cucumber, sliced ripe avocado, 1-2 cans of chick peas (drained), roast chicken (shredded into bite-size pieces)

Cook the quinoa per the directions on the package (the type we use calls for 2 cups of water for every 1 cup of dry quinoa, so we used just over 4 cups of water for this recipe).  While that's cooking away, slice the olives, tomatoes, and red onion and toss into a large mixing bowl.   Add the spinach and mix together.


Once the quinoa is ready, add it to the bowl.  Pour the marinated artichoke hearts (with marinade) into the bowl.  Use a knife to cut the artichoke hearts in half, if desired.  

Mix everything together thoroughly (I usually grab two spoons for this part to help the marinade coat all ingredients evenly).  

Using two spoons to toss everything together helps coat all ingredients evenly.

Scoop the quinoa salad onto serving plates (I like to put mine on top of a small bed of greens) and top with feta cheese.  Once the quinoa salad has cooled a bit, you can stir the rest of the feta cheese into the mixing bowl (but, warning, it will melt if you add it too soon!).  

Enjoy!

A colorfully healthy and protein-packed salad.

P.S.  A great way to finish the meal after a heaping plate of quinoa salad is with homemade Chocolate Chip Oatmeal Cookies and a glass of milk.  Yum!  Maybe we'll share the cookie recipe in a future blog post, if you're lucky.  ;)

Chocolate chip oatmeal cookies and a glass of milk are the perfect way to end this meal!

Wednesday, February 5, 2014

Before and After: More Counter Space, Please!

We often hear from our customers that it’s hard to envision what a redesigned kitchen will look like in their space. To help, we offer the following before and after story based on one of our real-life customer installations.

John and Denise first came to our showroom with the specific goal of increasing their counter space. 

After looking at the room, it became clear that we couldn't add counter space by leaving the room exactly as is. In order to create space for an island, we knew we had to move the table.  We proposed taking down the wall that separated the kitchen from the family room, moving the exterior door into the family room, and shifting the placement of the window above the kitchen sink.

By making these changes, we knew we could significantly increase counter space and incorporate the island John and Denise always wanted. Plus, with additional counter space, comes added storage.  

Here are some before and after shots to take a look at:

Before: Looking from the original kitchen into formal dining room.
After: Looking from the new kitchen into formal dining room.


Before: Kitchen window wall.
After: New kitchen window wall. We removed the door from the kitchen to allow space for the new cooktop.
After: A close-up of the hood and tile backsplash.


Before: The original closet next to the fridge.
After: We removed the closet and replaced it with a combination of tall pantry cabinetry with rollouts and double ovens. We added custom made wine cubes to the left of the microwave and a glass door cabinet for wine glasses on the right side.

Before: Looking from the family room towards the original kitchen.
After: Looking from the new family room towards the new kitchen. The wall between the rooms was removed and the original window was replaced with French doors. The removal of the wall was necessary to accommodate the island.